I would like to open this blog post with a word of praise and thanks to Michelle and Kim of Chase Street self Storage, who do so much to protect, encourage and support my work on this project at this location over the years. Thank you Thank you Thank you ladies!!! Gretchen
notice the finished trim around the bottom. I got a new/old oven to re furbish
notice the trim around the bottom
monkey's
full time job: the box s when I got him said he could run @ 10 miles an
hour and scratch @! 35 miles an hour, and boy he sure does!
notice the trim around the bottom
filter in it's place, home made mount,, charcoal filter for all water coming into trlr
this is the wiring, (almost done) for the running lights, required by
law. they are twisted together, then encased in heat shrink tubing, then
wrapped with electrical tape.
his is the small pump that will deliver water filter and stored in the 30 gallon tank out for drinking
this is the hose bib that delivers cleaned water ready to drink from the 30 gallon storage take
the little door opens, and inside is this hose bib
pull
the hose bib out, turn on the tap and any surface water that was put
into the trailer will come out clean and ready to drink or cook with.
this is the pump, mounted, that pulls water once used for bathing,
then sand filtered and stored in a 15 gallon tank under the bathroom up
to use in the washing machine. the corner of the washing machine can be
seen in the upper right corner. Under the washing machine is a second
15 gallon tank, to receive water used for washing bodies and then
re-used for washing clothes. This final collected grey water is removed
from the trlr by feeding the faucet of the pull out utility sink
accessed from outside.
this is the pump that pulls water out of the 30 gallon tank and delivers it to the bathroom for bathing
back doors skinned with recycled signs
looking at the bathroom door way. the sheets of metal there are the paneling for the bathroom walls
I was given this antique post civil war era tub faucet as a gift. I had
its' valves re-packed and bought the necessary connecting hardware to
install it in my bathroom
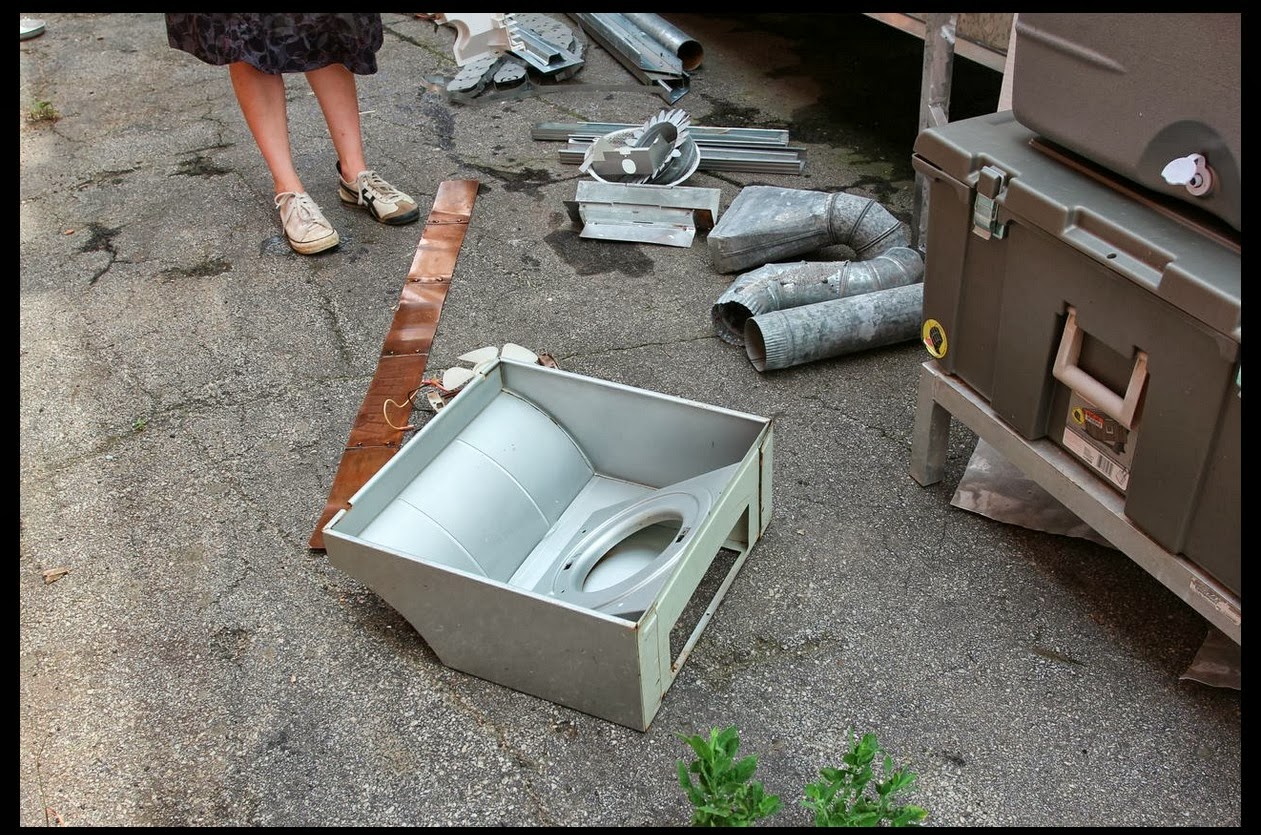
this is the composting toilet I have built. It uses worms
yup, just have a seat
toilet on wheels
inside the cedar box, built with half lap joints and thru pegs is an
apartment style worm composter and a urine collecting bucket
re-built reproduction faucet for the bathroom. bought @ habitat 4 Humanity and refurbish for cheaper than buying new
the bathroom sink, not quite nested right in the opening in the counter
top, but seen here with the faucet i bought @ the habitat 4 humanity
thrift store and then had re furbished for a total of $75.. much cheaper
than buying a piece of crappy crap new at the store.
as alwasy, thank you to Brandon Shultz
 the
bathroom floor, finished and installed. those two holes are for the
cold water feed that will flow through the copper manifold pictured
this is the bathroom floor, finished and installed.
this is the framing support in the floor that frames the openings of the under the floor storage compartments.
the
bathroom floor, finished and installed. those two holes are for the
cold water feed that will flow through the copper manifold pictured
this is the bathroom floor, finished and installed.
this is the framing support in the floor that frames the openings of the under the floor storage compartments.
 there will be four under the floor storage compartments total.
 here is pictured some of the wiring and junction boxes.
monkey parts
here is pictured some of the wiring and junction boxes.
monkey parts
 the
under the floor storage compartments are built with dish washer trays
with the tines cut out, line with yoga mats and anchored to the steel
frame with zip ties. the walls of the compartment (not pictured) are
made from burlap sacks I fashioned to fit the dimensions of the
compartment, and they are held in place to the steel frame with magnets
sewn into the top facing
it is kind of hard to see, but here is the frame that I had made from old plastic vacuum molds, given to me by Justin Roberts
that will trim the wood floor and hatch door of the compartment once
the floor is installed. It is here pictured situated over the frame
supports for the opening
This is a better picture of one of the floor storage compartment frames made for me by Andrew Flage of Saint Udio, from materials given to me by Justin Roberts
the
under the floor storage compartments are built with dish washer trays
with the tines cut out, line with yoga mats and anchored to the steel
frame with zip ties. the walls of the compartment (not pictured) are
made from burlap sacks I fashioned to fit the dimensions of the
compartment, and they are held in place to the steel frame with magnets
sewn into the top facing
it is kind of hard to see, but here is the frame that I had made from old plastic vacuum molds, given to me by Justin Roberts
that will trim the wood floor and hatch door of the compartment once
the floor is installed. It is here pictured situated over the frame
supports for the opening
This is a better picture of one of the floor storage compartment frames made for me by Andrew Flage of Saint Udio, from materials given to me by Justin Roberts
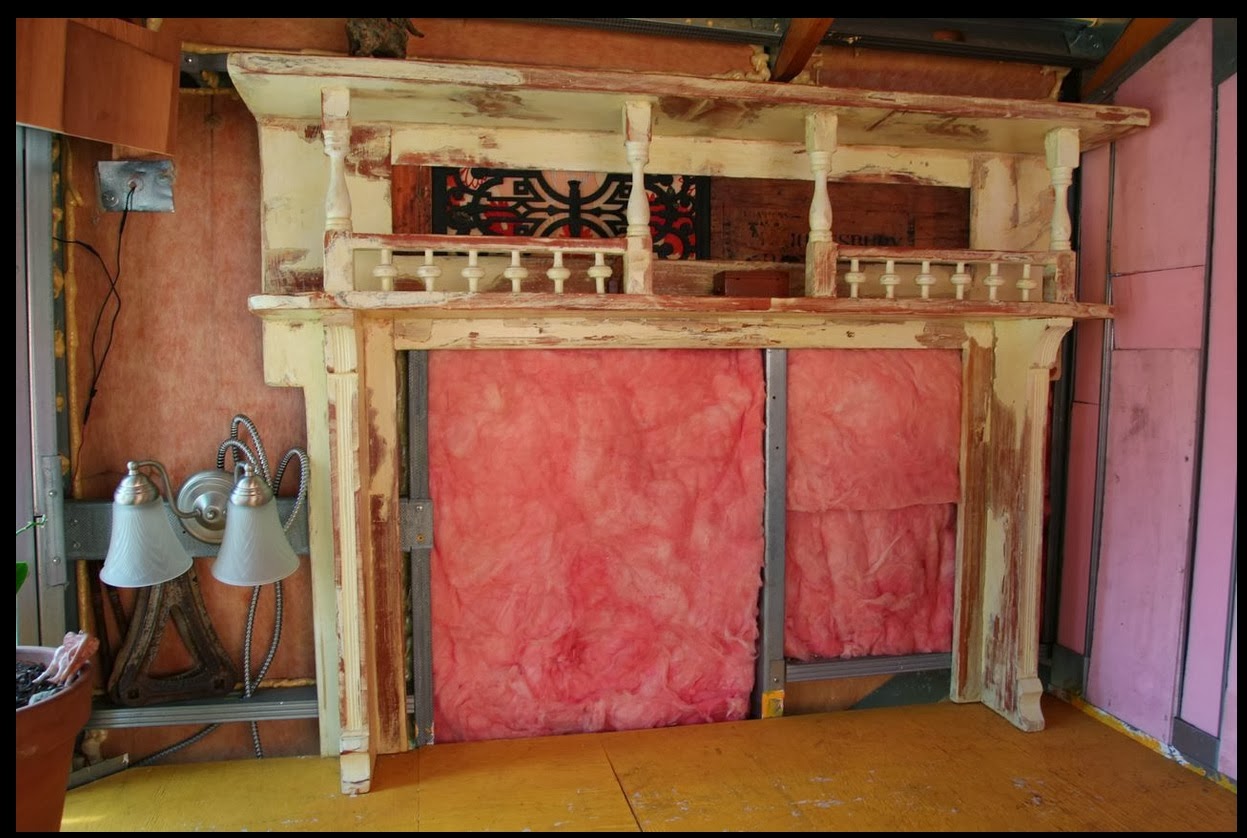
 this is a pile of insulation I dumpster dived from the remodeling of a
bank down town. it ha sbeen inside the suspended ceiling of the bank,
perpetually heated and cooled at a constant temp for 20+ years. seeing
as it had no mold or even any water damage on it I decided that I would
rather use it than buy even newly made product.
these
are the copper assemblies dry fitted together that accumulate hot and
cold water the be delivered to the bathroom and kitchen faucet fixtures
this
is the dry fit up of the copper manifold I am building that will be
mounted to a cutting board made from the stripes of cherry seen below
the blue foam the copper is resting on. the copper tank seen in the upper
part of the picture will accumulate water pumped from the 30 gallon
tank in the basement. the intake for that is in the top right of the
picture. the next intake to be seen,
just below the top one is where cold water will come into the system
from a "city water" or pressurized source. water then travels either to
the cold outlets for either the sink or the shower head, or to the on
demand hot wate heater, the white appliance on the right. once water has
been heated it will accumulate in the tank pictured in the lower
portion of the frame, and then distributed to the hot outlets for both
the sink and shower head.
here
are the batteries in their places in the trays anchored under the
floor. the vents seen on the font outside of the trailer lead to this
compartment. the batteries themselves sit in trays made from dish washer
racks, lined with yoga mats and attached to the frame with zip ties.
this is a pile of insulation I dumpster dived from the remodeling of a
bank down town. it ha sbeen inside the suspended ceiling of the bank,
perpetually heated and cooled at a constant temp for 20+ years. seeing
as it had no mold or even any water damage on it I decided that I would
rather use it than buy even newly made product.
these
are the copper assemblies dry fitted together that accumulate hot and
cold water the be delivered to the bathroom and kitchen faucet fixtures
this
is the dry fit up of the copper manifold I am building that will be
mounted to a cutting board made from the stripes of cherry seen below
the blue foam the copper is resting on. the copper tank seen in the upper
part of the picture will accumulate water pumped from the 30 gallon
tank in the basement. the intake for that is in the top right of the
picture. the next intake to be seen,
just below the top one is where cold water will come into the system
from a "city water" or pressurized source. water then travels either to
the cold outlets for either the sink or the shower head, or to the on
demand hot wate heater, the white appliance on the right. once water has
been heated it will accumulate in the tank pictured in the lower
portion of the frame, and then distributed to the hot outlets for both
the sink and shower head.
here
are the batteries in their places in the trays anchored under the
floor. the vents seen on the font outside of the trailer lead to this
compartment. the batteries themselves sit in trays made from dish washer
racks, lined with yoga mats and attached to the frame with zip ties.  in
the center of this picture is the steel frame supports that will be the
opening of the floor hatch access to the battery storage compartment.
the largest of the pairs of aluminum frames built by Andrew Flage of Saint Udio will frame this opening. the frame were made from re-cycled plastic vacuum molds given to me by Justin Roberts
here
are the batteries in their places in the trays anchored under the
floor. the vents seen on the font outside of the trailer lead to this
compartment. the batteries themselves sit in trays made from dish washer
racks, lined with yoga mats and attached to the frame with zip ties.
mc cable wiring and junction boxes
the pink gives a view of the profile of the loft bedroom
looking into the basement when there plumbing is. the the left is the tank below the washing machine
in
the center of this picture is the steel frame supports that will be the
opening of the floor hatch access to the battery storage compartment.
the largest of the pairs of aluminum frames built by Andrew Flage of Saint Udio will frame this opening. the frame were made from re-cycled plastic vacuum molds given to me by Justin Roberts
here
are the batteries in their places in the trays anchored under the
floor. the vents seen on the font outside of the trailer lead to this
compartment. the batteries themselves sit in trays made from dish washer
racks, lined with yoga mats and attached to the frame with zip ties.
mc cable wiring and junction boxes
the pink gives a view of the profile of the loft bedroom
looking into the basement when there plumbing is. the the left is the tank below the washing machine
l
ooking into the bathroom
spent a lot of time working under the trailer in this position
the framing under the floor that supports the wiring junction boxes. this is a view of the underside of the bathroom
this is one of two old ammunition crates passed down to my from my
maternal grandfather. I built them into the design of the trailer to
provide steps to get into the bedrooms and storage as well.  in
this photo is shown the two ammunition crates in situ as stairs and
storage. underneath the white crate will be an open spaces providing
ventilation for the bathroom fan to be vented out the bottom of the
trailer.
looking forward into the trailer. I used left over corrugated plastic
from the lining of the under belly of the trailer to create a partition
that dives the battery compartment from the rest of the basement area.
The white seen forward in this image is that partition.
everybody loves the rock ladder. i have 2 more rocks to install as hand holds on the roof, and then it will be complete!
Monkey hard @ work sniffing
components
collected thus far to build the hood vent that will be over top of the
over. I bought some of the copper engraved artwork of Justin Roberts
girl friend, Justine, and made it riveted together and annealed as trim
for when I get it all built. there will be a box made of the box elder
wood I have that covers the metal cowl that supports the fan, and the
copper will go around the bottom of the wooden box. the metal cowl will
be what is firmly anchored to the steel framing of the house.
here
also are pictured the two fans I have gleaned from the habitat 4
humanity thrift store. one for the kitchen fan and one to be installed
in the wall that separates the loft bedroom from the main living area,
pictures in the album "Living the Dream" as a pink foam paneled profile
of the loft bedroom size and shape. The fan will be installed in that
wall to help provide circulation. the oft also has a window that opens
these are the frame I had built from the re-cycled plastic vacuum frames given to me by Justin Roberts.
They are aluminum and were welded by a local artisan metal worker
named Andrew Flage. The out frame will trim the opening of the floor,
around the wood that will be installed on top of the honeycomb sub
flooring I am saving for ($3000). The inner frame will trim the hatch
door itself, and they nest snugly inside each other.
in
this photo is shown the two ammunition crates in situ as stairs and
storage. underneath the white crate will be an open spaces providing
ventilation for the bathroom fan to be vented out the bottom of the
trailer.
looking forward into the trailer. I used left over corrugated plastic
from the lining of the under belly of the trailer to create a partition
that dives the battery compartment from the rest of the basement area.
The white seen forward in this image is that partition.
everybody loves the rock ladder. i have 2 more rocks to install as hand holds on the roof, and then it will be complete!
Monkey hard @ work sniffing
components
collected thus far to build the hood vent that will be over top of the
over. I bought some of the copper engraved artwork of Justin Roberts
girl friend, Justine, and made it riveted together and annealed as trim
for when I get it all built. there will be a box made of the box elder
wood I have that covers the metal cowl that supports the fan, and the
copper will go around the bottom of the wooden box. the metal cowl will
be what is firmly anchored to the steel framing of the house.
here
also are pictured the two fans I have gleaned from the habitat 4
humanity thrift store. one for the kitchen fan and one to be installed
in the wall that separates the loft bedroom from the main living area,
pictures in the album "Living the Dream" as a pink foam paneled profile
of the loft bedroom size and shape. The fan will be installed in that
wall to help provide circulation. the oft also has a window that opens
these are the frame I had built from the re-cycled plastic vacuum frames given to me by Justin Roberts.
They are aluminum and were welded by a local artisan metal worker
named Andrew Flage. The out frame will trim the opening of the floor,
around the wood that will be installed on top of the honeycomb sub
flooring I am saving for ($3000). The inner frame will trim the hatch
door itself, and they nest snugly inside each other.
 these
are the boards that were once a book case and will be my decking,
presenting employed as flooring planks to give me something to walk on
inside. I am saving for the sub flooring, a recycled plastic honey comb
paneling that weighs 15 lbs a 4'x8' sheet, but costs 180 a sheet. I need
10 sheets and to ship them from Montana, where they are made, to
Georgia, where I am.
this is one of the decks I had built from the aluminum Stage pieces built by and given to my by Justin Roberts.
this one will be attached to the port side of the trailer, opening
out from the three paneled glass door. It will be stored for travel up
against the wall of the trailer, protecting the door. the decking
material are pine boards from recycled book cases I bought @ the habitat
4 humanity thrift store, and am working on staining a light blue and
varnishing. also pictured is my patio furniture, given to me by BIG JOHN
these
are the boards that were once a book case and will be my decking,
presenting employed as flooring planks to give me something to walk on
inside. I am saving for the sub flooring, a recycled plastic honey comb
paneling that weighs 15 lbs a 4'x8' sheet, but costs 180 a sheet. I need
10 sheets and to ship them from Montana, where they are made, to
Georgia, where I am.
this is one of the decks I had built from the aluminum Stage pieces built by and given to my by Justin Roberts.
this one will be attached to the port side of the trailer, opening
out from the three paneled glass door. It will be stored for travel up
against the wall of the trailer, protecting the door. the decking
material are pine boards from recycled book cases I bought @ the habitat
4 humanity thrift store, and am working on staining a light blue and
varnishing. also pictured is my patio furniture, given to me by BIG JOHN

this is one of the decks I had built from the aluminum Stage pieces
built by and given to my by Justin Roberts. this one will be attached
to the port side of the trailer, opening out from the three paneled
glass door, the other that is leaning against me will be attached on the
starboard side, opening for the two paneled glass door. Monkey always
gves me good input and listens attentively to me explain where and how
things go, he just can't help with any of the work. I am holding the
hinge parts that will be attached directing to the outside wall of the
trailer.
these
are the hinges that Andrew Flage made for me. They will allow me to
detach the decks from the side of the trailer and if need by use them as
ramps.
here is the starboard side deck positioned to show how it can be used as a ramp if needed


I went over to my friend William Jackson's
house one night, and he remarke that this matel piece was crowing his
living room and he would very much like to have it removed. I confessed
to him that I had always admired it and had been looking for something
like it to transform into a piece of furniture that could serve as a
head board for my master bedroom. So we
got to work, removed it from his house, i brought it to my site, cut it
down to size, and refinished it to look like this. the panel inserted
into the back is made from the last remaining pieces of an antique milk
crate given to me by my paternal grandmother, some cut plywood pieces of
scroll work I salvaged from an old piano found in the back of an
abandoned school house I passed once while on a bike camping trip way
out in the country side, and an vintage hand painted outer kimono, the
fabric of which is too fragile to use for making clothes.
this is the steel support for a fan in the master bedroom ceiling
these crates are anchored to the wooden left over bits from the
mantel, and will be worked on further to create storage compartments
with doors of some kind
this is the under side of the lid to the toilet. It is built froma
piece of re-cycled coutner top from habitat 4 Humanity Restore and
trimmed in cedar wood. The metal is a gutter and splatter shield, the
gutter diverts urine to the clear plastic jug and the little glass jar
receives the rob that holds the roll of toilet paper.


 here is pictured some of the wiring and junction boxes.


 this is a pile of insulation I dumpster dived from the remodeling of a
bank down town. it ha sbeen inside the suspended ceiling of the bank,
perpetually heated and cooled at a constant temp for 20+ years. seeing
as it had no mold or even any water damage on it I decided that I would
rather use it than buy even newly made product.
this is a pile of insulation I dumpster dived from the remodeling of a
bank down town. it ha sbeen inside the suspended ceiling of the bank,
perpetually heated and cooled at a constant temp for 20+ years. seeing
as it had no mold or even any water damage on it I decided that I would
rather use it than buy even newly made product.


 in
the center of this picture is the steel frame supports that will be the
opening of the floor hatch access to the battery storage compartment.
the largest of the pairs of aluminum frames built by Andrew Flage of Saint Udio will frame this opening. the frame were made from re-cycled plastic vacuum molds given to me by Justin Roberts
in
the center of this picture is the steel frame supports that will be the
opening of the floor hatch access to the battery storage compartment.
the largest of the pairs of aluminum frames built by Andrew Flage of Saint Udio will frame this opening. the frame were made from re-cycled plastic vacuum molds given to me by Justin Roberts


 in
this photo is shown the two ammunition crates in situ as stairs and
storage. underneath the white crate will be an open spaces providing
ventilation for the bathroom fan to be vented out the bottom of the
trailer.
in
this photo is shown the two ammunition crates in situ as stairs and
storage. underneath the white crate will be an open spaces providing
ventilation for the bathroom fan to be vented out the bottom of the
trailer.


 these
are the boards that were once a book case and will be my decking,
presenting employed as flooring planks to give me something to walk on
inside. I am saving for the sub flooring, a recycled plastic honey comb
paneling that weighs 15 lbs a 4'x8' sheet, but costs 180 a sheet. I need
10 sheets and to ship them from Montana, where they are made, to
Georgia, where I am.
these
are the boards that were once a book case and will be my decking,
presenting employed as flooring planks to give me something to walk on
inside. I am saving for the sub flooring, a recycled plastic honey comb
paneling that weighs 15 lbs a 4'x8' sheet, but costs 180 a sheet. I need
10 sheets and to ship them from Montana, where they are made, to
Georgia, where I am.